Here is a little help that shows
you how to set an account for nPOP in order to send and receive emails.
This is not a review of the product neither a help on how to use it, simply a
help to set it.
It works for me and there is no reasons that it should not works on your
machine. I set the program in less
than 5 minutes.
Before starting, please be sure to have all the necessary information given by
your email provider
(this include your login name, password, pop and smtp server names, connection
login name and password).
The HP Dial-up should also have be already set.
The addresses used in this help are my addresses, so do not set your account
with my addresses, it will not work.
- Download the file here (select the file "Windows CE 2.11 and later (MIPS, SH-3, SH-4, StrongARM)"
- Use Winzip in order to open it.
- Run "ActiveSync" and click on the "Explore" icon
- On the Jornada, create a new sub-folder called nPOP under "\Program files"
- Drag and drop from Winzip the file "npop.exe" (ARM version) to the sub-folder "nPOP" of the Jornada.
- On your Jornada, open the folder "\Program Files\nPOP" and select the file "nPOP.exe"
- To create a shortcut on your desktop, simply copy the selected file by using the menu "Copy" or use "CTRL+C", then open the folder "\Windows\Desktop" and use the function "Paste Shortcut" from the menu. Now you have an icon on your desktop. To create a shortcut on the main menu (under the Start button --> Program), repeat the action above, but instead of pasting the shortcut under "\Windows\Desktop", simply paste it under "\Windows\Program" sub-folder.
- To run the program, tap on the desktop icon, or use the "Start --> Program" Menu.
3) Settings
The first time the program
runs, you are prompted to enter the parameters of your account:
POP3 TAB:
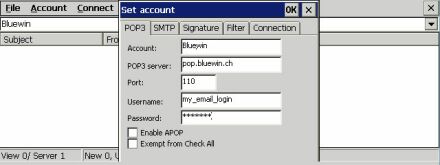
Account:
This is the name you want to give for this account (you can
create multiple accounts).
POP3 server:
The most common time, this string is composed by
"pop." followed by the name of your provider (eg: usa.com)
(this information has been given by your provider). The POP (Post Office Protocol), is the protocol used to received the emails.
Port:
It is set to 110 by default (do not modify, except if your provider
gives you special instructions).
Username:
This is normally the first part of your email address, the
string before the @ string (eg: henri.spagnolo)
Password:
Well, your password.
SMTP TAB:

Name:
This is the name you want to display (it will be used instead of
displaying your email address) when sending an email.
Address:
This is your complete email address
SMTP server:
This string may be different depending on the provider, the
most common time it is "mail." or "smtp."
followed by the name of your provider (eg: usa.com) (this information has been given by your
provider). The SMTP (Simple Mail Transfer Protocol), is the protocol used to send emails.
Port:
It is set to 25
by default (do not modify, except if your provider gives you special
instructions).
Enable SMTP-AUTH:
Do not check this box (this is an authentication
and it is not sure your server is enabled for that).
This authentication depend upon the provider and is used as annoyance mail prevention,
so sometime transmission
from outside is not permitted. When transmitting please verify whether certification is necessary or not.
POP before SMTP:
If checked, then before sending the email, the
user will be authenticated using the POP.
Send copy to self:
When you send an
email a copy is sent to your inbox.
Signature TAB:

Here you enter your signature or something you wants to add at the end of your
message in an automated way. This is an option,
and if you do not want to use it, leave it blank.
Filter TAB:

This act as a rule, in case you do
not want to receive specific emails containing a specific string,
or in case you want an action is performed automatically when receiving an
email.
Connection TAB:

LAN:
Select this option if
you want to connect through a Local Area Network.
Dial-up:
This option is certainly the most commun used for connecting
using a modem of a mobile phone.
Connection:
Select here the connection you want to use that you have
previously set using the HP dial-up.
Username:
The login name you normally use to log to Internet.
Password:
Well, agin your password.
Under connection, it reconnects:
If you check this box, the program will
simply reconnect in case you were already connected using the HP Dial-up program or another one.
4) Font
In order to be able to read
your messages, it is necessary to set a font in the .INI file thats nPOP uses.
 .
.
5) How to read
HTML email messages?
Open the nPop.ini and edit
the lines:
ViewApp="\Windows\iexplore"
ViewFileSuffix="htm"
Now you can open the message using "File -> External viewer" that
will launch PIE. Thanks Jose Aguas for this.
6) Enjoy
Run the program again. Now you are able to received and send emails. And without
using the HP Dial-up program, you can simply
use the "Dial-up Connect" from the nPOP menu "File" in order
to connect.
Also, I recommended that you have a look at the "Options" function
under the menu "File" in order to set your preferences.
For your information, the mails displayed by nPOP are only the mails that are present on the
server. Therefore, if a mail is deleted
from your server
it will disappear from a list, even if the mail is displayed in the list.
I hope this will help you.